Top 10 Preseason Planter Tips

Something went wrong. Please try again later...
  1. Level the Planter. Check the hitch height. The tractor hitch height may vary due to the tractor tire size, tractor manufacturer, and the type of planter (Draw bar vs. 2 pt hitch). Refer to the planter operator's manual for set up. Make sure the planter's tool bar is level (vertically) or running slightly up hill. When planters tip down, coulters run too deep and closing wheels run too shallow.
  2. Check Bushings and Parallel Linkage. Worn bushings increase row bounce which increases seed bounce. Stand behind the row unit and wiggle it up and down and back and forth checking to make sure bushings are tight.
  3. Drive System. Check every chain. Kinked chains cause shock and vibration in the meter. Start with fresh, lubricated chains and check them daily. Include transmission chains, meter drive chains and insecticide box chains.
  4. Calibrate Corn Meters. Calibrated meters can help add six or more bushels per acre. On finger units check brushes, fingers, springs, back plates and seed belts for wear. On air or vacuum planters check brushes, gaskets and disks or drums for cracks or wear. Replace all worn parts. A good cleaning will also help improve performance. It is recommended having finger units set on a MeterMax¹ planter stand.
  5. Double Disk Openers and Depth Wheels:
    Double disk openers -
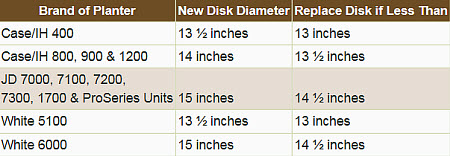
    Test to make sure there is good contact between the double disks. Slide a business card from the top down along the front of the disks until the card won't lower any further. Mark that spot with chalk. Then, take the card from the back and slide it forward until it stops. Mark that spot and measure the distance between the two marks. If it is less than two inches, reship or replace the disks. In general, the disks must be replaced when they lose 1/2 inches in diameter.

    Table comparing planter brands, new disk diameters and replacement disk diameters.

    Depth wheels - Check rubber tires for cracks and wear. Wheels should run tight against double disk openers to ensure seed furrow does not collapse. Reduced inner diameter gauge wheels help to reduce sidewall compaction in wetter conditions such as reduced or no-till.
  6. Seed Tubes. Inspect seed tubes for wear at the bottom. If the tubes have a small dog ear flap on the left side of the seed tube, turn constantly. They should gently turn sporadically, especially through areas of thick residue.
  7. Closing Wheel System. Consider an alternative to rubber closing wheels. For cool, moist planting conditions, take a look at running one spike wheel (15 inches) and one rubber wheel (13 inches). The spike wheel can help chop the sidewall improving fracturing and sealing in the tough soil conditions. For no-till, an even more aggressive approach may improve trench closing. Two 13" spike wheels with a drag chain provide the most aggressive action.
  8. Closing Wheel Alignment. With your planter sitting on concrete, pull ahead about 5 feet. Look at the mark left behind the planter by the double disk openers. The mark should run right down the centerline between closing wheels. If a closing wheel is running too close to the mark, adjust the closing wheels to bring it back to center.
  9. Row Cleaners. With higher levels of residue and more corn-on-corn, almost any planter can benefit from well adjusted row cleaners. Row cleaners sweep residue from the row, warming the soil around the seed trench, reducing wicking and seedling blight. Make sure row cleaners gently sweep residue - you don't want to move soil, just residue. Watch the row cleaners running. They shouldn't turn constantly. They should gently turn sporadically, especially through areas of thick residue.
  10. Get Organized. Have your Crop Field Plans by hybrid/variety and populations organized; seed ready, planter monitors working/programmed and tractors/tenders in tune.


Logo - Metermax

MeterMax® is a registered trademark of Precision Planting, Inc.