
Country Selector
Please enter a valid location
Best Practices for Corn Silage Production
Desirable for its high yields, digestibility and high-energy, corn silage remains one of the most popular options for feeding livestock, but what kind of production decisions make the biggest impact on yield performance?
Here’s some advice on bunk management strategies, optimal chop times and timing your harvest for optimum moisture:
- Silage Bunk management strategies
- Optimal harvest timing
Silage Bunk management strategies
When it comes to best practices for bunk management, the effort and attention put into proper packing cannot be overstated.
1. Start clean.
- Asphalt and or concrete flooring generally provide the best results and reduce the risk of water seeping through seams
- Remove old silage and dirt
- Open and exposed areas allow the sun and rain to increase sanitization
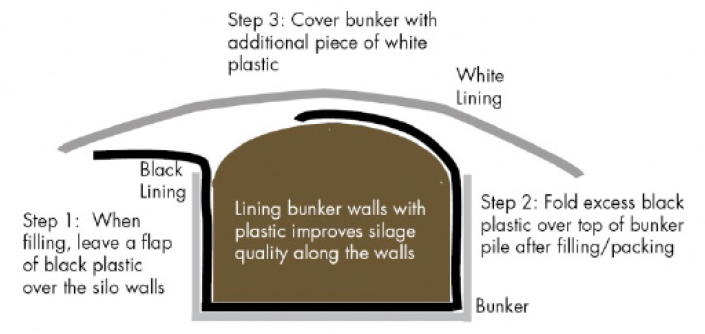
- Lining the inside of a bunker with plastic prior to filling helps prevent seepage
- Oversized liners can be used to create a better seal
2. Minimize oxygen exposure. Once the crop is ready to harvest you need to move quickly from chopping to packing to limit exposure to oxygen which aids in the fermentation process.
- Chop, spread and pack within 2 hours to minimize potential losses
- Cut at approximately ½” for unprocessed silage and ¾” for processed
- Use repeated heavy compaction to reduce air pockets and minimize oxygen entrapment
- Silage inoculants can also be used to help prevent heating of the silage pile and help to reduce spoilage
- Utilize kernel processors to increase starch availability and reduce waste
- Although it can decrease silage yield, Increasing the cut height up to 18” will help increase plant digestibility
3. Silage pile density is key.
- The ideal target density is 15 lb DM/cu ft3
- Consider using multiple tractors to increase compaction or adding additional weight to tractors to increase density
- Keep packed layers under 6”. Thicker layers will trap more oxygen and result in poorer quality feed
4. Cover quickly. Covering and sealing as fast as possible produces better quality silage.
- Moving quickly to cover and seal your bunker helps minimizes oxygen exposure and reduces dry matter losses
- Seal immediately after completion. Use oxygen barrier films and thicker plastic covers (at least 5mm thick). A quality seal utilizing multiple plastic covers helps improve fermentation and digestibility and reduce spoilage
- Utilize cut tires, truck tire sidewalls or gravel filled bags to keep coverings in place and helps avoid losses caused by elemental forces and prevents air infiltration
- Inspect covers on a regular basis. Ensure edges and seams are weighed down and intact. Look for and repair any tears or damage caused by animals. Discard any spoiled feed.
Optimal harvest timing
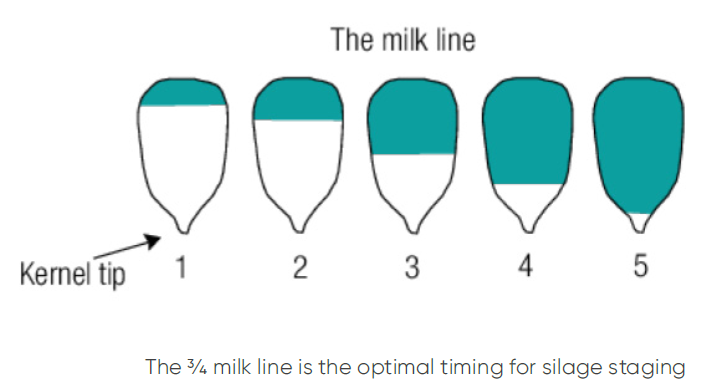
One of the most important decisions in corn silage production is optimal harvest timing. This means finding the best balance between maximum kernel maturity and overall plant health to maintain fiber digestibility and moisture for packing and fermentation of the silage. Typically, this will be achieved at ¾ milk line in healthy plants and ½ milk line for unhealthy ones. Regardless, it involves getting into the field to assess both.
1. R3 Milk Stage: Crop is green and actively growing.
- Corn plants towards the outside of the field can mature faster than those further into the field, so go in a few rows to pull an ear from a plant that best represents the overall field maturity
- Shuck the corn ear paying attention to kernel colour (yellowing) and potential denting
- Break the ear in half and examine the core of the top half to see if a starch line is present
- Heavily liquid, lack of denting, softer kernels and no starch line indicate the crop is far from maturity
2. R5 Dent Stage. Crop is still green but does not show signs of active growth.
- Repeat the process from the previous stage
- Look for grain denting, a sign that starch is now present (and developing)
- Examining the radius of the broken ear should now reveal the development of a starch line within the kernels
- Check the milk line and test for uniform grain firmness
- Kernels that are softer and milkier with liquid towards the tip of the kernel are still a couple weeks away from harvest
3. ½ Milk Line. Visually the crop has entered dry down, plant moisture is decreasing, and grain fill has slowed down.
- Husks are noticeably drying-off
- Repeat previous steps
- Look for heavier denting and a milk line that has moved closer to the core of the ear (a good sign that the kernel is filling with starch)
- Cut or break apart a kernel to see the development of hard starch within
- 40% grain moisture with whole Plant dry matter between 40 – 45%
- Although this stage does not represent the peak of fiber digestibility, it is the optimal harvest timing for unhealthy plants
4. ¾ Milk Line Stage: Crop is almost at full maturity
- Milk line has moved further down
- Grain fill is complete
- Kernel is full of starch
- Increased fiber digestibility can be achieved by chopping higher
- Silage inoculants can also be added as you are chopping to increase dry matter recovery and increase digestibility of the silage
- Target 62-68% whole plant moisture – the key point is to get the moisture in the correct range, too wet or too dry can significantly affect the quality of your silage
- 36% grain moisture with whole Plant dry matter between 35 – 40%
- This is optimal harvest timing for healthy plants
Have questions on this or other corn related topics? Contact your local Pioneer Sales Representative.